Showing posts with label baking. Show all posts

Tuesday, July 9, 2013

Baking for America: min-pies and crumbles four ways


Happy birthday, America! 

To celebrate the Fourth of July, most folks probably spent last Thursday drinking beer, grilling burgers and trying to make stuff blow up in their backyards. 

Sadly for Jake and I, we no longer have a grill or a backyard. Last year the Fourth fell right after our move, so we did the whole fireworks on the National Mall, celebrate our nation in the nation's Capital thing. 

This year, we decided to honor America with old-fashioned desserts like pie and crumbles. 


There aren't a ton of fruits that I like to eat cooked. Jake's fillings are on the left: rhubarb mixed with cinnamon, vanilla and bourbon; then strawberries, rhubarb in orange juice. My fillings, made up of the two fruits I will eat cooked: raspberries with orange juice, and blackberries with lemon zest. 

We used a simple butter crust recipe, using Michael Ruhlman's Ratio method. Measurements to create a double pie crust for a standard sized pie dish made enough for these two mini-pies and had some left over.


This was my first attempt at doing a double pie crust. Jake's rhubarb pie had a simple covered crust with a slit, and I tried a lattice for my blackberry. (Sadly, I burned the lattice a bit)


Next we moved onto attempting to make fruit crumbles. Jake had a delectable-looking peach crumble down at the Waterfront a few weeks ago, and we've both been thinking about trying out hand at it since.

Again, having never done this before, most of this was a stab in the dark.


We learned the hard way, for instance, not to use frozen berries for this. My raspberry filling (above right) was a bit thin and the berries essentially turned to slush. I had a few blackberries leftover from my other filling and added a couple of strawberries to try and bulk the filling up. I also used quite a bit more flour for the raspberry filling than we used for Jake's strawberry rhubarb. 


Doubled up on this tasty crumble topping recipe: brown sugar, oatmeal, pinch of salt and a little flour. We added the zest of a grapefruit to Jake's crumble topping, I added a little cinnamon and chopped pecans to mine. 

All in all, the baking for America was a success. I found I enjoyed the cooked berries in both of my desserts, and got some great use out of my mini pie plates (mine are similar to these).


Inside peek at Jake's rhubarb pie.


Raspberry, blackberry and strawberry crumble with a scoop of vanilla ice cream. 


Friday, January 11, 2013

January #LetsLunch: Trying Something New


This month, our #LetsLunch host challenged us to try something new in the new year. Many of us will be posting recipes we've tried for the first time, or something we've always wanted to tackle.

My parents came to visit over the summer and we went to a Washington Nationals baseball game. My dad got super excited when he saw the concessions stand was offering up gluten-free soft pretzels.


I decided to try and recreate those pretzels for my dad when I was home over Christmas last month. He seemed to really enjoy them, and mentioned how much he used to love soft pretzels when he was younger.

I adapted this recipe from Serious Eats, using the homemade blend of gluten-free flours my dad uses for baking. The original author calls for a blend of white rice flour, brown rice flour and tapioca starch. I used a blend of white rice, tapioca starch and potato starch and thought they tasted delicious.


What I liked about these pretzels was how simple they were to make. The biggest pain with them is the hour and a half of dead time while you're waiting for the dough to proof. The other downside is that you get a fairly small yield. The recipe calls for 12 pretzels, but they would be pretty tiny. I went with splitting the dough into 8 pieces.


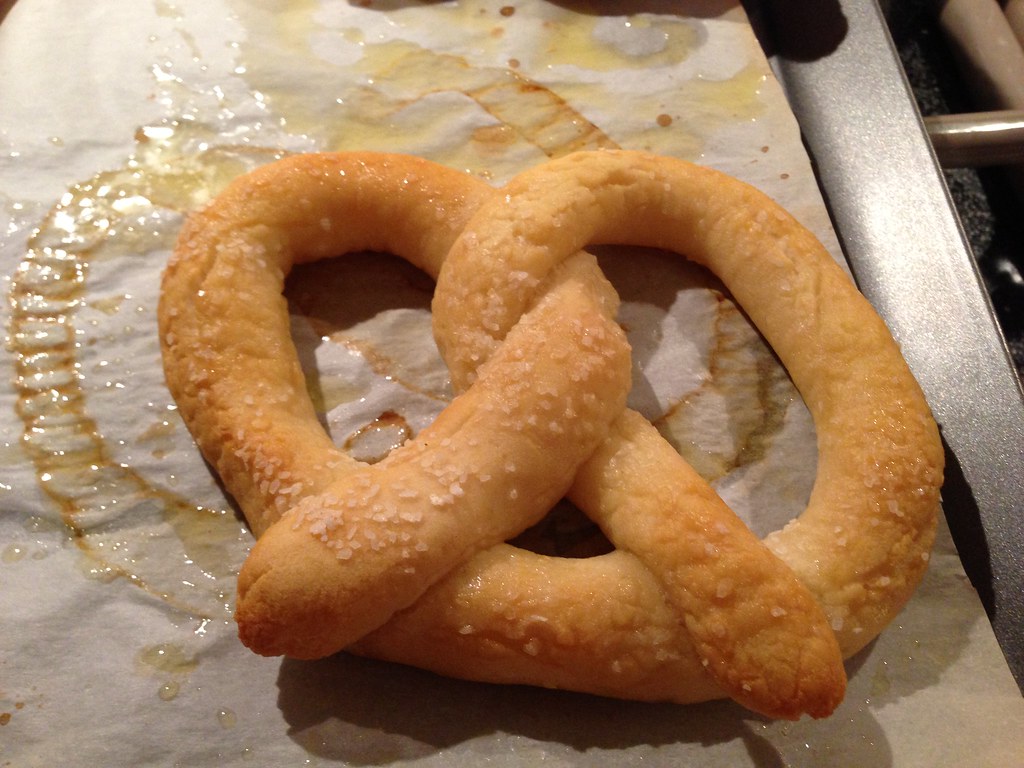
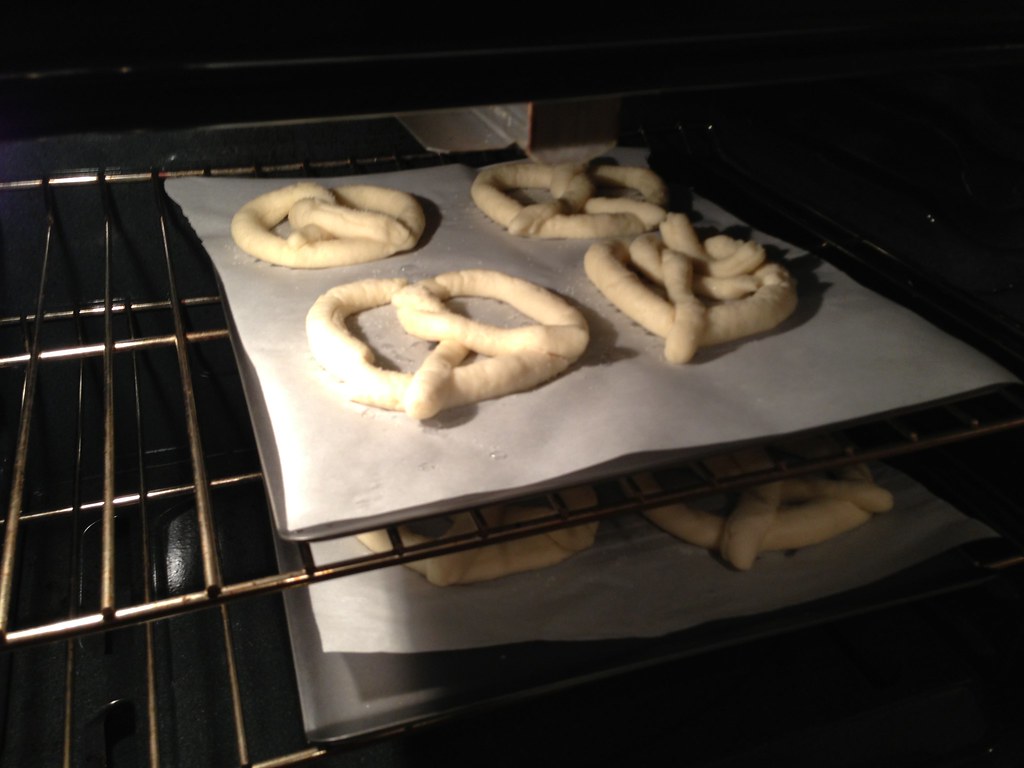
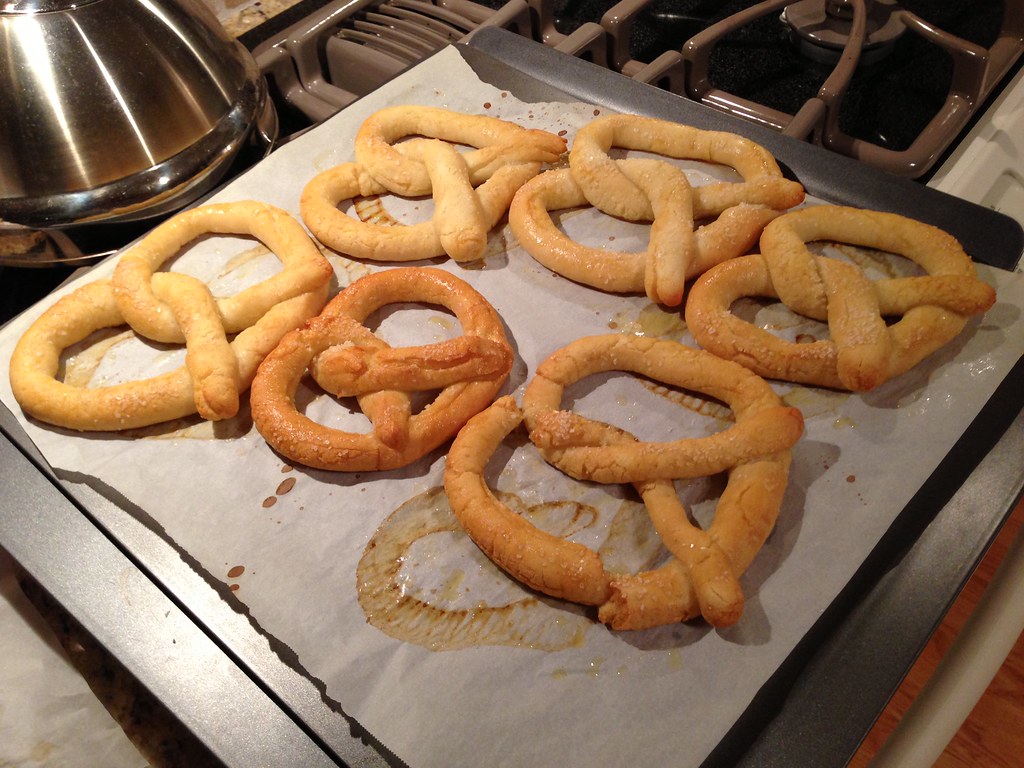
When you shape the pretzels, I found it's better to make them a bit fatter and smaller, like the near one in this photo. You can see a skinnier, larger pretzel in the background there. Most of those were difficult to remove from the soda bath because the pretzels broke off into pieces (see below).


The other place I diverged from the original Serious Eats recipe is in brushing the finished pretzels with a little melted margarine. It gives them that extra layer of flavor you'll get in the ballpark -- a little buttery, a little sweet, a little oily.


You can see my experimentations with the sizes and widths of the pretzels here. The second batch I made were much more uniform in shape. Also, for a gluten-free snack, they were very delicious! I was tempted to eat some of these but decided it was best to save them for my dear-old-dad.

Overall, I would say this was one of my more successful attempts at gluten-free baking for dad. In the past treats have had that characteristically gritty texture or generally haven't held up well (the cinnamon rolls debacle of Christmas 2011 comes to mind). I think for one, the use of xantham gum in this recipe is a huge help in binding the dough and giving it some stretch. Secondly, I think my dad really has perfected the homemade blend of flours and starches. I had much better luck with his blend than using a store brand "gluten-free baking mix"for the cinnamon rolls last year.

RECIPE: Gluten-Free Pretzels -- adapted from seriouseats.com
3 3/4 cups homemade gluten-free flour blend (combine white rice flour, tapioca starch and potato starch)
1 teaspoon salt
1 teaspoon xanthan gum
1/2 teaspoon baking powder
1 cup warm water plus 2 tablespoons
1 packet (2 1/4 teaspoons) active dry yeast
1 large egg
3 tablespoons light corn syrup
2 tablespoons vegetable oil
1/4 cup baking soda
2 tablespoons sugar
4 tablespoons melted margarine

* In a small bowl, combine 1 cup warm water and yeast and stir until foamy. Allow to stand for three minutes while you whisk together flours, salt, xantham gum and baking powder. Add the egg, corn syrup, vegetable oil and yeast mixture to the flours and mix until a dough forms.

* Knead dough gently for five minutes until it becomes smooth. You may need to put a little white rice flour down to knead the dough (the kitchen I was working in had granite countertops and I didn't need it). Transfer to an oiled bowl, cover and allow to rise in a warm place for 90 minutes or more.

* Bring 4 quarts of water to a boil and preheat the oven to 425. While the water is coming to a boil, split the dough into eight pieces and cover with plastic wrap or a damp towel while you work. Take each ball one at a time, roll into a long skinny log, about 14 inches long. Twist into a heart-shape, then press the ends to the bottom. You may need to rewet the bottom edges and press firmly in order make them stick during the boiling process. (Serious Eats has a good photo slideshow of the shaping process)

* Add baking soda and sugar to the water bath. Boil pretzels one at a time until they float. If a pretzel looks like it is beginning to break, remove it immediately. Place boiled pretzels on a parchment-lined baking sheet and sprinkle with kosher or pretzel salt.

* Bake for about 25 minutes, rotating your baking sheets about halfway. Brush the hot pretzels with the melted margarine immediately and serve while hot. You can also freeze the cooled pretzels and reheat in a toaster over later.

Yield: 8 pretzels

---

LetsLunch is a monthly meetup of food bloggers from around the globe. We post themed recipes on the first Friday of each month and share via Twitter and Facebook.

Want to join us? Send us a tweet using the hashtag #letslunch and say hello. I'm @emmacarew

Take a look at what everyone else has posted for this month's new recipes for the new year:


Sunday, March 4, 2012

Baking marathon: red velvet cake, funfetti cake, mocha cake and salted caramel cake.

Last week I embarked on my second largest baking project ever. My high school journalism program, ThreeSixty Journalism, asked me to donate a few cakes to their mid-winter fundraiser for people to win as prizes.

Last Saturday, I baked a red velvet cake, two batches of the chocolate cake I made for Karyn's wedding, and a funfetti cake, based on this recipe. I also baked a batch of red velvet cupcakes to bring along for volunteers or anyone else to nibble on. I wrapped the cooled cakes in plastic wrap and left them in the fridge until Wednesday.


Wednesday, I made three large batches of vanilla buttercream and a double batch of cream cheese frosting for the red velvet. I flavored two batches of the buttercream with espresso and salted caramel sauce (I doubled this recipe from Michael Ruhlman's blog). I was very impressed with both of these flavors. You can see all of my favorite cake gear here: the cake boards stacked in the back, our awesome cupcake carrier (a wedding gift from a great friend), lot and lots of plastic wrap to keep the cakes fresh and safe between baking and decorating, offset and flat spatulas for icing, my cheap but reliable cake turntable, and in that white plastic bin in the front, that's where I keep my decorating tips and pastry bags.


I was also testing a product for the Food Now! newsletter, a cake slicing kit. I was able to make the funfetti and red velvet cakes into four layer cakes (I thought they looked very nice), and the single 10-inch layer of mocha cake into a slim two layer. The kit worked really well - but definitely better with the funfetti cake, which was a butter cake and much more firm.


Here's the salted caramel getting the crumb layer of icing. I filled between the layers with the rest of the caramel sauce. I think it was a bit too thin though, it was hard to keep it from running out the sides.


My freezer is jam packed, but thankfully it was a chilly day outside. I used my porch as a freezer to help firm up the icing after the crumb coating. This is the 10-inch mocha cake and the 8-inch salted caramel.


Not surprisingly, I was in a rush on my way out the door, so I forgot to take photos of the finished and decorated cakes. I was worried about transporting them, but each finished cake sat outside for probably 30 minutes before driving, so the frosting was firm, and the dollop of frosting between the cake board and the cake carrier had time to set, which minimized sliding. 

Here are the cakes out for display with some of the others donated by volunteers and staff. On the far left, my four-layer red velvet, topped with cream cheese frosting, and decorated with strawberries and pecan halves. In the middle an M&Ms and KitKat bar cake baked by one of my former editors. On the far right, the 10-inch mocha cake, decorated with crushed Oreo pieces. 


Top left: the 8-inch salted caramel chocolate cake, with caramel sauce filling and salted caramel buttercream, decorated with a star pattern around the edge. Top right: a vanilla frog cake by one of the staff. Botton: the 8-inch vanilla funfetti cake with vanilla buttercream and topped with tons and tons of sprinkles. 


The fundraiser was a success and I had a ton of fun baking all of these cakes. 

Recipes: 

RED VELVET CAKE 
(adapted from Paula Deen's Food Network recipe) 
*Note: After baking this cake a few times per year, I can tell you purchasing red food color each time is a pain--also somewhat expensive. I finally purchased a large bottle (maybe 20-30 ounces) of red food color in bulk at my local Asian grocery (Twin Cities friends: I bought mine at the Shaung Her in Minneapolis) for $8, or the cost of 2 or 3 of those little bottles.

For the Red Velvet Cake:
  • 2 1/2 cups all-purpose flour
  • 1 teaspoon baking soda
  • 2 tablespoons cocoa powder (I like natural cocoa from Penzey's Spices)  
  • 1 1/2 cups granulated sugar
  • 2 eggs
  • 1 1/2 cups canola or vegetable oil
  • 1 teaspoon vinegar
  • 1 ounce (1-2 TBS) red food coloring*
  • 1 teaspoon vanilla
  • 1 cup buttermilk (or 1 cup milk + 1 TBS white vinegar, at room temperature)
For the cream cheese frosting:
  • 2 sticks butter at room temperature
  • 1 (8-ounce) package cream cheese at room temperature
  • 3-4 cups powdered sugar (about 1 lb, or half a bag)
  • 1 tsp vanilla
  • 1-2 TBS milk or cream, as needed.
* Preheat oven to 350 degrees F. Prepare two cake pans with nonstick spray, flour and parchment paper. 

* In a medium sized bowl, sift together dry ingredients until completely combined. 

* In the bowl of a stand mixer fitted with the paddle, mix eggs, oil, color and buttermilk. 

* Add the dry ingredients to the wet ingredients in three batches. Drizzle in vinegar and vanilla and mix only until fully combined. 

* Split evenly among the cake pans then bake for 24-26 minutes, or until cake tester comes out clean. 

* Cool completely before frosting. 

>> To make cream cheese frosting: beat butter and cream cheese on medium high until fluffy and fully combined. Add the vanilla then lower mixer speed and add powdered sugar 1/2 cup at a time. Mix on medium 5-7 minutes, then test texture. If the frosting still feels grainy, mix another 3-5 minutes until smooth. 


CHOCOLATE CAKE
(Ina Garten's Beatty's Chocolate Cake recipe)
Serves 12 or makes 24 cupcakes.
Note: This is a time to break out the really good cocoa powder. From "The Barefoot Contessa," by Ina Garten, who recommends extra-large eggs in her recipes, though large will work fine.
• Butter, for greasing the pans
• 13/4 c. flour, plus more for pans
• 2 c. sugar
• 3/4 c. unsweetened cocoa powder
• 2 tsp. baking soda
• 1 tsp. baking powder
• 1 tsp. kosher salt
• 1 c. buttermilk, shaken
• 1/2 c. vegetable oil
• 2 eggs, at room temperature
• 1 tsp. vanilla extract
• 1 c. freshly brewed hot coffee
Directions
Preheat the oven to 350 degrees. Butter two (8-inch) round cake pans. Line with parchment paper, then butter and flour the pans.
Sift the flour, sugar, cocoa powder, baking soda, baking powder and salt into the bowl of an electric mixer fitted with a paddle attachment; mix on low speed until combined.
In another bowl, combine the buttermilk, oil, eggs and vanilla. With the mixer on low speed, slowly add the wet ingredients to the dry. With mixer still on low, add the coffee and stir just to combine, scraping the bottom of the bowl with a rubber spatula.
Pour the batter into the prepared pans and bake for 35 to 40 minutes, until a cake tester comes out clean. Cool in the pans for 30 minutes, then turn them out onto a cooling rack and cool completely. (If brushing with Raspberry Glaze, see directions at right.)
Place one layer, flat side up, on a flat plate or cake pedestal. With a knife or offset spatula, spread the top with frosting. Place the second layer on top, rounded side up, and spread the frosting evenly on the top and sides of the cake.
(Source: http://www.startribune.com/lifestyle/taste/recipes/131156498.html) 

VANILLA BUTTERCREAM (the starting point for 3 of my cakes): 6 sticks of butter (room temperature), one 2 lb. bag of powdered sugar, 1-2 tsp clear vanilla flavoring (you can use regular vanilla for the salted caramel and espresso batches), 1-2 TBS milk or cream as needed. 
> Mix the butter on medium high in a stand mixer for 7-10 minutes until shiny and fluffy. Slowly add the powdered sugar with the mixer on low 1/2 cup at a time. When desired consistency has been reached, turn the speed on the mixer up to medium again, and mix 5-7 minutes, then test for graininess. 
Variations: Mix 2-3 TBS very strong espresso (I used 4 TBS Cafe Bustelo coffee grounds with about 6 ounces of water, then strained.) with the butter on low before adding the powdered sugar OR mix 1 1/2 cups salted caramel sauce with the butter before adding the powdered sugar. 

Sunday, February 20, 2011

"whoopsie" pies - an accidental success

Now that I'm home on Mondays instead of Saturdays, I try to make my day off a mix of a few things: relaxing and occasionally staying in bed until noon, running my errands, and doing some serious damage in the kitchen.

A few weeks ago, I decided to do another test run on the cakes I'm baking for a friend's wedding this summer. I was pretty sure I had locked into a cake recipe, but wanted to try another just to be sure. I chose this recipe from Pioneer Woman.

You'll notice the title of this post isn't "really awesome test run cupcakes." So, clearly a few things went wrong.

First, I somehow ran out of cupcake papers, so I was forced to use my silicone cupcake tray. I'm not a huge fan of this, because it usually makes squat little cakes rather than nice fluffy ones.

Next, and more importantly, I somehow managed to leave the leavening agent out of the cake batter. So my first batch of "cupcakes" came out like little hockey puck cakelettes. I halved the baking soda in the recipe and added it for the second batch.

My second batch stuck to the silicone pan and were mostly ruined, until I decided to lop off the bottoms and just use the tops to make whoopie pies.

So, I sliced all the little flat cakes in half, and paired them up along side the more cake-like tops of the actual cupcakes. I whipped a batch of the peanut butter mousse I will probably use for the wedding this summer and my "whoopsie" pies were born.

The  slightly smaller ones are the ones without baking soda, and the larger ones on the upper right are the more cakelike ones. 

Overall, they were still really delicious. I think I like my original whoopie pies recipe better but this was definitely a decent way to save this recipe. 


PEANUT BUTTER MOUSSE FILLING:
Mix 1 stick of butter with 1 cup of peanut butter on high. Slowly add 1 tsp vanilla and about 2 cups of powdered sugar.
If filling is too crumbly, dribble up milk one teaspoon at a time. Add 1 more cup of powdered sugar, or until fluffy.

Friday, December 10, 2010

#LetsLunch: Holiday side dishes edition (December)

**updated! final bread photos
-----
I almost didn't make it to #letslunch this month.

On Wednesday, I was 100% blindsided by this:


First I panicked and wished I had just saved my Thanksgiving post on gougeres. Then I thought maybe I would just sit this round out. But driving home last night, I decided on a happy middle ground: Dave's peasant bread (Dave is Jake's dad and also an awesome cook). He made this bread for Thanksgiving and It. Is. Awesome.

So, here's the "cheat" -- my bread isn't done yet. In order to develop jaw-dropping-mmm-inducing flavor, this baby sits and sits and sits (first in the fridge, then just room temp) for 12 hours, then 18 hours. We're at about hour 7 of the second rise as I write...

So, the bread starts with a little yeast (I used about 1/2 packet), 1 cup wheat flour, 2 cups white/bread flour, and a pinch of salt. This is essentially a no-knead, long rise bread, so I just started all of my ingredients in my new red-and-polka-dot dutch oven.

 Mix in some water - about 2 cups. You want a wet, shaggy dough to form.

Mix together well until all of the flour mixture is absorbed. 

Put a lid on it, stick it in the fridge for 12 hours. (see, I told you my baker was cute! It might not be a "real" Dutch oven... but it was $20 at Home Goods)

 This morning, I took a quick peek at my dough, then left it out on the counter to rise. I'm so excited to bake it tomorrow!

***Updated: here's the final product:

I couldn't wait to taste it! 


Recipe: Daves Peasant Bread
(it turns out I tweaked this a bit / looked at the measurements wrong last night -- the ingredients call for 2 1/2 cups bread/white flour, 1/2 cup wheat flour... my bad)
* Combine ingredients in a large bowl, add water and cover with plastic. Refrigerate up to 12 hours. If you're in a rush, you can skip this step.
* Let dough rise 18 hours in a warmish/room temp place. Then sprinkle work surface with flour, and fold dough over itself to form a square or ball shape.
* Line a baking sheet with parchment and dust with flour. Place dough and cover with a kitchen towel. Allow to rise 2-3 more hours.
* Preheat a dutch oven (w/o the lid) for 30 minutes at 450 degrees. Transfer the dough to the pot, bake 30 minutes covered, then 15-30 minutes uncovered. Turn out and cool.

---------------------------------------------------------------------------------------------------------------
#letslunch is a monthly "gathering" of food-loving writers from all over, hosted by Cheryl Tan, of A Tiger In The Kitchen.

We agree on a date and a theme, then each blogger presents his or her recipe on the chosen date (today).


If you are interested in joining, please send a Tweet using the hashtag and introduce yourself!

Here's what the others have presented so far:

Leek Gratin, at Bon Vivant
Kimchi Risotto Bake, at Cooking in the Fruit Bowl
A "slice of Americana," at GeoFooding
Gluten Free Green Bean Casserole, at Free Range Cookies
Parker House Rolls with Molasses Butter, at The Kitchen Trials
Mushroom Leek Quinoa Salad, at Cowgirl Chef
Festive Green Beans, at Hot Curries and Cold Beer

Tuesday, December 7, 2010

Thanksgiving 2010: Pecan Pie

My second offering for Thanksgiving was a pecan pie. I decided to pair Pioneer Woman's pie filling with a pie dough using Michael Ruhlman's Ratio app.


I decided to use half butter and half shortening for my pie crust after reading this tutorial on Epicurious.

Thanks, Chao for picking up the shortening for me!

Took some smart advice from blogs and retail reporters to stock up on baking essentials the week before Thanksgiving. Prices on ingredients like nuts and butter were way lower than normal.


Pie crust is another great use for the food processor. Fit the bowl with the dough blade and pulse the butter and fat together until crumbly. Then, add ice water bit by bit until a sticky dough forms.

My dough went into the refrigerator over night, then I rolled it out between two pieces of wax paper (harder than it sounds, actually).

Roll the crust over the wax paper, then lay into a pie dish. Trim the edges and cover until ready to fill.


(pretty good for my first real pie crust, huh?)

And again, we were a little pressed for time, so I just whipped up PW's pie filling in a tupperware and brought it with us. We baked the pie at Jake's while we were eating dinner.

It's entirely true that I should not have brought a pie to someone else's thanksgiving that I had never made before in my life. It's also entirely true that I should have listened to PW's note at the bottom of the recipe, where she clearly warns that the bake time for this pie is unpredictable:

"Required baking time seems to vary widely with this recipe. Sometimes it takes 50 minutes; sometimes it takes 75!"

And, indeed, the pie took about 75 minutes. It was soft and beautiful and had a really nice flavor.

Happy (late) Thanksgiving, everyone.

Thanksgiving 2010: gougeres

We spent our Thanksgiving this year with Jake's family, and I volunteered to add a pie and a roll to the mix.

Well, as previously mentioned, the seollangtang took up much more of my morning than expected, so I quickly realized I wasn't going to have time to let a yeast roll rise, so I switched gears for cheese gougeres.

I inherited a nice chunk of fancy Gruyere from a friend and tossed it through the food processor.

I folded this cheese into a big batch (double what I normally make, I think) of pate a choux.


Choux paste is painfully easy to make and so versatile. Melt butter and water together, then dump in flour and beat in a pot over medium heat until steam is mostly gone.


Beat the dough on medium to high speed to release heat, then beat eggs one by one. For this double batch I think I added 8 eggs total. Dough will be sticky and shiny. You can also use a hand mixer for this. 

I also added about 1 TBS of bouquet garni herbs to the dough with the cheese, then piped the gougeres onto parchment lined baking sheets with a star tip.


Bake the gougeres at 450 degrees for 10-15 minutes until they are puffed up and slightly golden. Rotate the pans and switch racks, then lower the heat to 350 (325 if the bottoms seem burnt) another 10-20 minutes. To test, break open a gougere. The inside should be mostly dry.

Cool the gougeres and serve warm or reheated in the oven at 200.

Sunday, August 15, 2010

Kitchenaid has arrived!


My life is complete. I officially own a stand mixer!! I hadn't expected to be investing in something this large so soon, but I had $40 in Amazon gift cards, it was on sale AND Kitchenaid is currently running a rebate promotion. It seemed too good of a deal to pass up.

Sadly, it's been HOT in St Paul this week, so I haven't gotten to use it yet!

It finally cooled off a little tonight, and I used some tomatoes from Jake's dad to make a great marinara sauce.

I also popped a batch of cheese and herb biscuits into the oven. They weren't a stand mixer project, but they are pretty damn tasty!


Generally, I followed the Amateur Gourmet recipe I've used in the past except for a few steps:
* I found I needed closer to 3 cups of flour. 2 cups gave me more of a thick pancake like batter.
* I added 1/3 c shredded gouda to the dough just before the buttermilk.
* Sprinkled the tops with chopped thyme and oregano from Jake's dad's garden. Also about 1 tsp kosher salt
* After the initial 5 min bake, I took them out, brushed them again with a little butter and sprinkled a little more gouda.