Saturday, June 8, 2013

LetsLunch: Too Hot to Cook (Let's Make a Cheese Plate)


Once again, I'm a bit late on my LetsLunch offering. This month, hosted by Grace of Hapa Mama, we all contributed dishes for when the summer heat is really cranking and it's too hot to cook. 

I cheated a little and popped my bread slices in the toaster oven, but other than that this simple, delicious cheese plate is a breeze to throw together. 

From top right corner moving clockwise: peppercorn white cheddar, strawberries, brie, raspberry habanero preserves, green grapes, honey goat gouda, salad and crostini. 

The black peppercorn cheddar and strawberries are lovely together, and the preserves turned out to be a nice complement to both the brie and the goat gouda. A little prosciutto or nice salumi wouldn't be out of place here either, but I didn't happen to have any on hand. 

--
Be sure to check out the other fabulous hot weather recipes put together by our LetsLunch crew.

Cheryl's Mango Key-Lime Pie on A Tiger in the Kitchen

Anne Marie‘s Lettuce Sandwich at Sandwich Surprise


Grace‘s Mung Bean Shaved Ice at HapaMama
Linda‘s Coconut Creamsicle Sodas at Free Range Cookies
Linda‘s Escape From San Francisco Picnic at Spicebox Travels
Lisa‘s Campari Granita at Monday Morning Cooking Club
Lucy‘s “The Girl in a Hat Goes on a Picnic” at A Cook and Her Books
Monica‘s Peanut Salad at A Life of Spice
Pat‘s Harvest Red Rice Salad at The Asian Grandmothers Cookbook

Sunday, June 2, 2013

Feels like summer, tastes like summer: easy oven ribs and homemade hushpuppies


Here we go, trying to get back to blogging recipes on a more regular basis.

After getting back from a week away in Denver and Colorado Springs, my fridge was completely empty. We picked up a few essentials from the Safeway and I was delighted to find first: that baby back ribs are on sale for a few weeks and second: that sweet corn season has officially started.

I had to dig around in the bins for a bit to find these good ears, but they were miraculously ripe and delicious.

After a week of dry heat in Colorado, the humidity of DC was a bit of a rude welcome home gift. This entire dinner was so satisfying and simple to make.


RECIPE: Easy Oven Ribs

2 lbs baby back ribs
3 TBS rib rub (or make your own: garlic, brown sugar, paprika, kosher salt, etc)
1/2 cup barbecue sauce (I used Sweet Baby Ray's)

* Preheat oven to 350 F
* Pat both sides of the ribs liberally with the rib rub and wrap loosely in foil.
* Place on a sheet pan and bake for 45 minutes.
* After 45 minutes, open the foil pack and brush both sides of the ribs with sauce. Wrap the foil back around the ribs and bake another 45 minutes.
* After 90 minutes total baking time, unwrap the foil and baste the ribs with sauce a second time. Leave the foil pack open and return the ribs to the oven, increasing heat to 450 F. Bake for another 20 to 30 minutes.
* Allow to rest 10 minutes before serving.

RECIPE: Homemade Hush Puppies


1 1/4 cup each white and yellow cornmeal (or 2 1/2 cups of which ever you happen to have on hand)
2 tsp sugar
2 tsp baking powder
1 TBS salt
1 heaping tsp cayenne powder
1/2 cup finely minced onion
2 cups milk
2 eggs
1-2 quarts vegetable or canola oil for frying

* In a small saucepan, heat one quart of oil slowly over medium heat.
* While the oil is heating up, whisk the dry ingredients together.
* In a separate bowl whisk together milk and eggs. Add to dry ingredients, allow to rest 5-10 mins.
* Test heat of oil with a drop of batter - it should begin sizzling and frying immediately.
* Use a tablespoon or small ice cream scoop to drop balls of batter into the oil, fry 6-8 minutes until golden brown.
* Cool on a paper towel, serve with honey butter.


Thursday, May 9, 2013

LetsLunch: Celebrating Asian American/Pacific Islander Heritage Month


Happy LetsLunch, everyone!! I am so excited about this month's theme: dishes to celebrate Asian American/Pacific Islander Heritage Month.

I've written many times about how I often feel trapped between the many cultures I belong to. I've never felt like I could truly identify with being Korean or truly Asian American, since I was not really raised in either culture.

But food has always been a way for me to feel a strong tie with my Korean roots. Would it have been nice to have learned how to make Korean bulgogi from my weihalmonie before she passed away? Of course. But, the beauty of the Internet is that I had Maangchi, right in my own home, acting as my own personal ajumma to teach me my favorite Korean foods, like bulgogi.

So without further ado, here's my quick and dirty guide to making Korean barbecue at home.


Much of Korean barbecue can be made up as you go. Everyone's mom and grandma makes it differently, as far as I can tell. This recipe relies on finely minced Asian pear and brown sugar for the sweetness. You can also use honey, mashed kiwi or even cola. This marinade, for about 1 lb of meat, is 3/4 cup soy sauce, 1/3 cup rice vinegar, 1/4 cup sesame oil, scant 1/4 cup canola oil, 3 TBS brown sugar, half an Asian pear (finely minced), all whisked together.


Korean barbecue has gotten quite popular, especially in cities with big Korean populations like Washington, D.C. (where I live) and New York City. Within a 20-30 minute drive from my house, there are literally dozens of kogijibs, or meat houses, where barbecue is the specialty. (Pro tip: if you're looking for an outstanding Korean restaurant, look for one that operates in the native Korean style of specializing in one dish or type of food.) I got an early start on this week's dish. The onion slices, mashed garlic and ginger, and some salt and pepper went into a bag with the meat a day or two before I was ready to cook. I added the marinade the morning I was going to grill.


Someday, I aspire to own one of those fabulous one-off butane grills and a tilted Korean barbecue grill like the ones they use at restaurants (or like this one). For now, I have a fabulous electric wok that I absolutely love, and it creates a really nice sear on meat like this. (if you're feeling curious about the meat, this happens to be skirt steak, but you can use almost any thinly-sliced, tender cut of beef you like. I've made it with everything from eye round to filet mignon)


While the meat was resting, I also grilled up the marinated onion slices with some lovely enoki mushrooms. Always buy twice as money enoki mushrooms as you think you'll need--they really shrink down when you cook them!


The benefit of making Korean barbecue at home is you can yank the meat off the grill while it's still medium rare. I'm not a huge fan of how long they usually leave the meat on your grill at Korean barbecue restaurants because it allows the meat to cook completely through. Snip the meat into bite sized pieces with scissors.


No Korean meal would be complete without panchan (two of these are storebought, one is homemade), so load your plate up and enjoy! At a restaurant, you might be given a basket of lettuce leaves (and bitter perilla leaves if you're feeling extra traditional), some sliced garlic, soybean paste and rice to make cute little lettuce wraps.


You can also sub little sheets of gim (this is actually nori, but shhh they're so similar) to wrap around your rice, kimchi and meat! I am fairly certain there is a Korean name for eating your food this way, but I've never managed to pick it up (as it's not something you would see on a menu in a restaurant).

So there you have it, the illustrated guide to Korean barbecue in the home. If you want to make kalbi instead of bulgogi, get short ribs instead of steak. You can get the kind that is pulled off the bone, or the kind sliced sideways, with the bone slivers still in tact.
--
LetsLunch is a monthly meeting of food bloggers from around the world. We share themed blog posts via Twitter, Facebook and Pinterest. We would love to have you join us, just tweet using the hashtag #LetsLunch to introduce yourself!

Check back to see what the others are posting on Friday for Asian American/Pacific Islander Heritage Month:
* Lucy's Chinese Chicken Salad on A Cook and Her Books
* Lisa's Sesame, Eggplant and Noodle Salad on Monday Morning Cooking Club
*
*
*
*

Friday, April 12, 2013

April Let'sLunch: Spring Break Foods


Happy April's LetsLunch, everyone!

I volunteered to act as our host this month and suggested the theme: "Spring Break Foods." I've been super excited the past few weeks, planning for my "adult spring break" trip to Disney World.

I didn't know I was going to make pizza as my Spring Break Food. But, as luck would have it, a friend gifted a set of Mickey pizza plates to me last week and I knew my LetsLunch was set.


There's nothing fancy about this pizza. I used a garlic herb crust from Trader Joe's, some whole milk mozzarella, and a simple homemade tomato sauce.


To make the sauce: heat 1 can of whole tomatoes, mostly drained, plus half an onion, and a pinch of salt for about 15 minutes. Remove about half of the tomatoes and most of the onion, and pulse with a hand blender, then break the remaining tomatoes gently with a spoon. Stir the blended tomatoes back into the broken ones. Add a splash of red wine and continue cooking at least 5 more minutes. If the sauce seems too thin, stir in some tomato paste, 1 TBS at a time. 


I pre-baked the crust for about 8 minutes with a little cornmeal underneath to add some texture. Then sauce and cheese (less of both than might think), and back in the oven at 475 for about 15 minutes.

And, this is the part where you get to see how ugly my pizza turned out. Which is fine, if you ask me. In the competition between food being delicious and beautiful, I'll take delicious. The cheese aggressively sliding off my slice just means it was a) abundant and b) incredibly melty.

So, I hope the rest of my LetsLunchers are finding ways to get away or find some R&R at home this spring. A week from today I'll be heading to Disney World (again!) to visit a friend of mine who works at Animal Kingdom.

--
Let's Lunch is a monthly virtual lunch date made up of foodies and bloggers from all over. Want to join us? Send us a tweet to introduce yourself using the hashtag #LetsLunch.

Check out what everyone else made this month:

Jill's Basil-Infused Cotillion Cocktail at Eating My Words
Lucy's Pepperoni Pizza Swirl Muffins at A Cook and Her Books
Lisa's Beetroot and Salmon with Horseradish at Monday Morning Cooking Club
Linda's Instant Carrot Cake at Free Range Cookies
Karen's Sourdough Sandwich Bread at Geofooding
Linda's Guide to Eating in Cancun at Spicebox Travels
Ann Marie's Mofongo with Ground Beef at Sandwich Surprise

Friday, February 8, 2013

#LetsLunch: Super Bowl Wings, Two Ways


So far in the new year, I'm continuing to be sadly neglectful to this little blog. But, I was very excited to work on these tasty wings for Super Bowl Sunday last week! 

Our Lets Lunch group picked foods to eat while watching sports on tv this month -- just in time for last week's Super Bowl (or, the Stupid Bowl as I often refer to it).

I love Super Bowl wings. Ever year, whether I'm with a big group, a small group, or if, like this year, it's just me and my husband, I like to go all out for chicken wings for the Super Bowl. 

Some years I make buffalo wings, other year's I've made sticky teriyaki wings. This year I went with Korean Fried Chicken again and also pulled together a curry-spiced wing recipe for Lets Lunch. 

I borrowed some techniques for battering and frying chicken from this Serious Eats Food Lab post. I thought it worked well for the curry wings, but ultimately may not have been worth it for the Korean wings. 


To start, I gave each pound of wings a couple hours of soaking in a buttermilk bath spiced with salt, pepper and coarsely chopped garlic (about 8 cloves for each batch). The curry spiced wings also got a tablespoon of sweet curry powder. After a few hours, I drained the wings from the buttermilk.


This is the step I borrowed from Serious Eats: coating the wings in a mix of corn starch, baking soda and salt. I think for the curry wings it added a nice crispness to the end result. It made less of an impact on the Korean wings, because of the gochuchang sauce that gets added at the end.

The other aspect I borrowed from Serious Eats was in the batter, though, instead of following the recommendation for using half water and half vodka, I took a chance with a beer batter. This was absolutely the right choice (I used about 3/4 of a Blue Moon) and it was delicious. After prepping and frying the Korean wings, I mixed a tablespoon of Moroccan spice rub, a tablespoon of sweet curry powder, and a teaspoon of cayenne pepper into the batter for the second half.


It took about a bottle and a half of mixed peanut and canola oils to fill my wok to acceptable frying levels. In the past, I have sometimes steamed the wings first to ensure that they cook completely. This year, I went with a slightly longer frying time (around 10-12 minutes) to get a nicely browned outside on the wings.


In the end, the Korean wings get tossed with a sweet and spicy gochuchang sauce and topped with toasted sesame seeds and green onions. The curry wings get an aggressive salting as soon as they're removed from the wok.

--
Lets Lunch is a digital monthly meet up of food bloggers and writers.

Check out other posts from around the web here or on the hashtag #LetsLunch

Cheryl's Mongolian Buuz at A Tiger in the Kitchen

Annabelle's Idiazabal and Black Pepper Gougeres at Glass of Fancy
Grace's Taiwanese Beef Sliders at HapaMama
Jill's Spiced Pecans at Eating My Words
Karen's Sporting Eats at GeoFooding
Linda's Trio of Salsas from Oaxaca at Spicebox Travels
Lisa's Sausage Rolls at Monday Morning Cooking Club
Lucy's Crabcakes with Chipotle Mayo and Citrus Salad at A Cook and Her Books
Rashda's Finger Lickin’ Good Curried Ribs at Hot Curries & Cold Beer

Friday, January 11, 2013

January #LetsLunch: Trying Something New


This month, our #LetsLunch host challenged us to try something new in the new year. Many of us will be posting recipes we've tried for the first time, or something we've always wanted to tackle.

My parents came to visit over the summer and we went to a Washington Nationals baseball game. My dad got super excited when he saw the concessions stand was offering up gluten-free soft pretzels.


I decided to try and recreate those pretzels for my dad when I was home over Christmas last month. He seemed to really enjoy them, and mentioned how much he used to love soft pretzels when he was younger.

I adapted this recipe from Serious Eats, using the homemade blend of gluten-free flours my dad uses for baking. The original author calls for a blend of white rice flour, brown rice flour and tapioca starch. I used a blend of white rice, tapioca starch and potato starch and thought they tasted delicious.


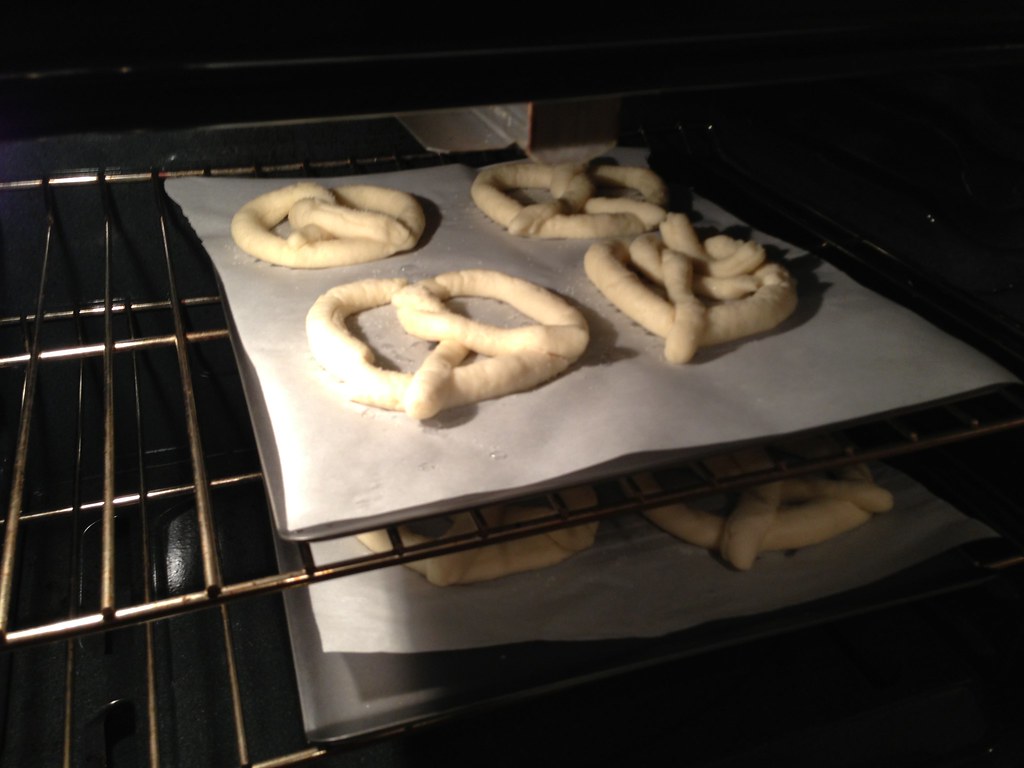
What I liked about these pretzels was how simple they were to make. The biggest pain with them is the hour and a half of dead time while you're waiting for the dough to proof. The other downside is that you get a fairly small yield. The recipe calls for 12 pretzels, but they would be pretty tiny. I went with splitting the dough into 8 pieces.


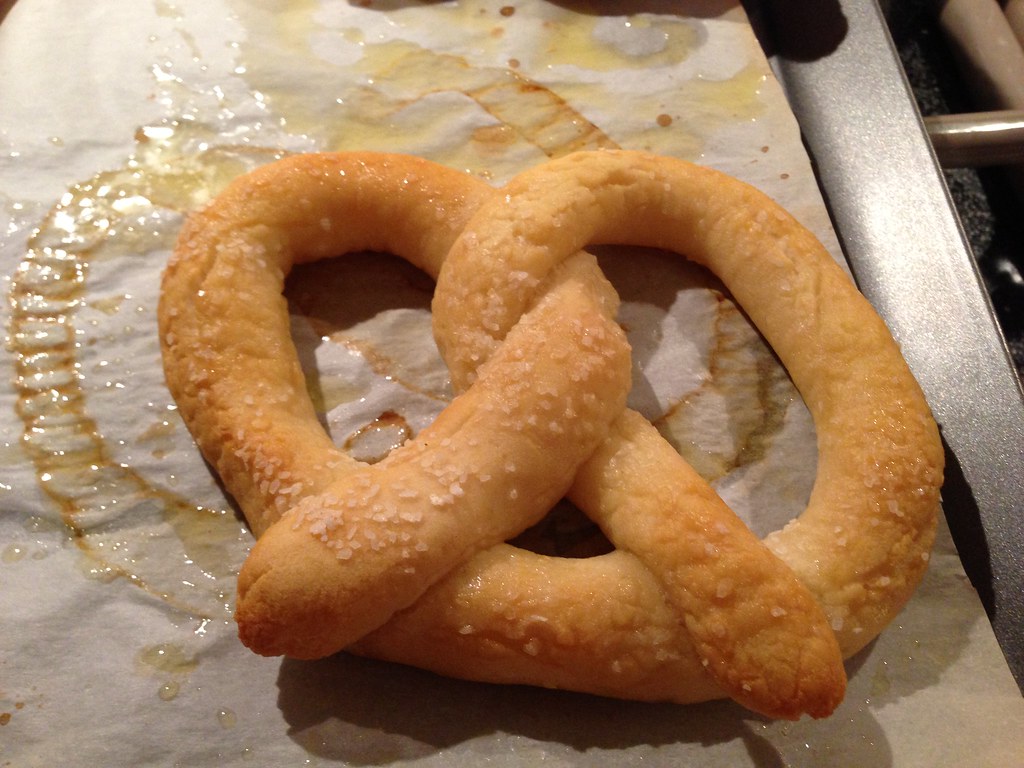
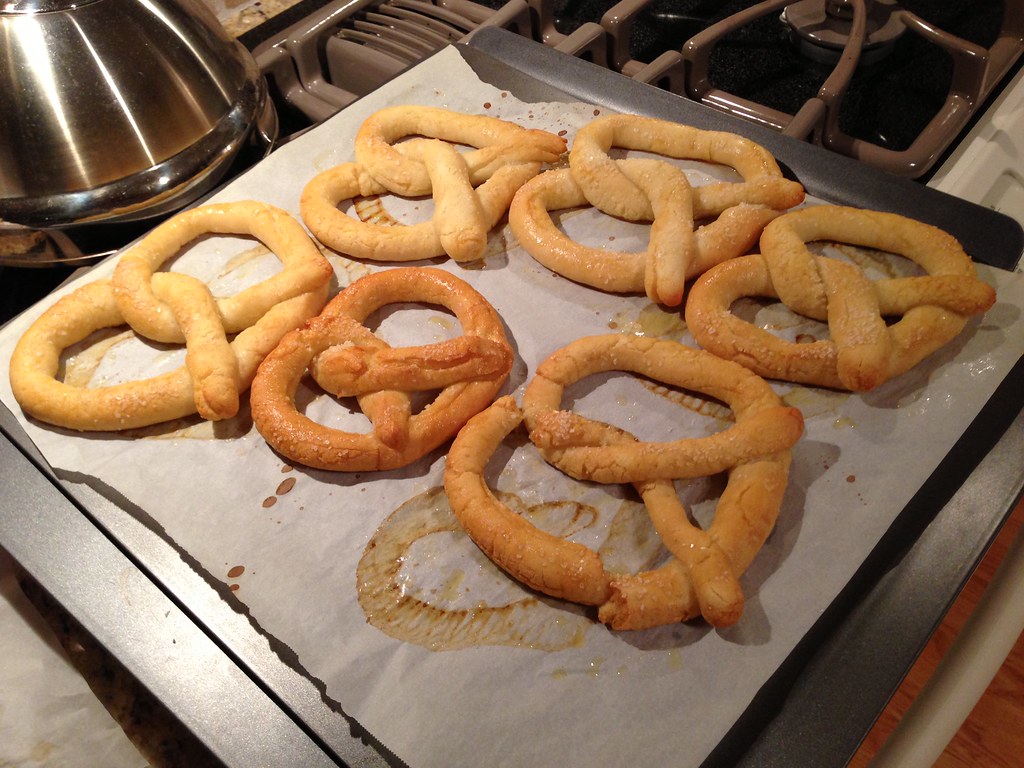
When you shape the pretzels, I found it's better to make them a bit fatter and smaller, like the near one in this photo. You can see a skinnier, larger pretzel in the background there. Most of those were difficult to remove from the soda bath because the pretzels broke off into pieces (see below).


The other place I diverged from the original Serious Eats recipe is in brushing the finished pretzels with a little melted margarine. It gives them that extra layer of flavor you'll get in the ballpark -- a little buttery, a little sweet, a little oily.


You can see my experimentations with the sizes and widths of the pretzels here. The second batch I made were much more uniform in shape. Also, for a gluten-free snack, they were very delicious! I was tempted to eat some of these but decided it was best to save them for my dear-old-dad.

Overall, I would say this was one of my more successful attempts at gluten-free baking for dad. In the past treats have had that characteristically gritty texture or generally haven't held up well (the cinnamon rolls debacle of Christmas 2011 comes to mind). I think for one, the use of xantham gum in this recipe is a huge help in binding the dough and giving it some stretch. Secondly, I think my dad really has perfected the homemade blend of flours and starches. I had much better luck with his blend than using a store brand "gluten-free baking mix"for the cinnamon rolls last year.

RECIPE: Gluten-Free Pretzels -- adapted from seriouseats.com
3 3/4 cups homemade gluten-free flour blend (combine white rice flour, tapioca starch and potato starch)
1 teaspoon salt
1 teaspoon xanthan gum
1/2 teaspoon baking powder
1 cup warm water plus 2 tablespoons
1 packet (2 1/4 teaspoons) active dry yeast
1 large egg
3 tablespoons light corn syrup
2 tablespoons vegetable oil
1/4 cup baking soda
2 tablespoons sugar
4 tablespoons melted margarine

* In a small bowl, combine 1 cup warm water and yeast and stir until foamy. Allow to stand for three minutes while you whisk together flours, salt, xantham gum and baking powder. Add the egg, corn syrup, vegetable oil and yeast mixture to the flours and mix until a dough forms.

* Knead dough gently for five minutes until it becomes smooth. You may need to put a little white rice flour down to knead the dough (the kitchen I was working in had granite countertops and I didn't need it). Transfer to an oiled bowl, cover and allow to rise in a warm place for 90 minutes or more.

* Bring 4 quarts of water to a boil and preheat the oven to 425. While the water is coming to a boil, split the dough into eight pieces and cover with plastic wrap or a damp towel while you work. Take each ball one at a time, roll into a long skinny log, about 14 inches long. Twist into a heart-shape, then press the ends to the bottom. You may need to rewet the bottom edges and press firmly in order make them stick during the boiling process. (Serious Eats has a good photo slideshow of the shaping process)

* Add baking soda and sugar to the water bath. Boil pretzels one at a time until they float. If a pretzel looks like it is beginning to break, remove it immediately. Place boiled pretzels on a parchment-lined baking sheet and sprinkle with kosher or pretzel salt.

* Bake for about 25 minutes, rotating your baking sheets about halfway. Brush the hot pretzels with the melted margarine immediately and serve while hot. You can also freeze the cooled pretzels and reheat in a toaster over later.

Yield: 8 pretzels

---

LetsLunch is a monthly meetup of food bloggers from around the globe. We post themed recipes on the first Friday of each month and share via Twitter and Facebook.

Want to join us? Send us a tweet using the hashtag #letslunch and say hello. I'm @emmacarew

Take a look at what everyone else has posted for this month's new recipes for the new year:


Friday, December 14, 2012

#LetsLunch December: Celebrations from around the world


So, after a long hiatus from this blog (and LetsLunch), I'm making my triumphant return.

What have been up to in the meantime? In September, I agreed to start developing a series of recipes for a friend's blog, Being Geek Chic. In October, I took a new job (actually, it's pretty much the same as my old job) at The Chronicle of Philanthropy. In addition to working on our signature surveys (collecting and analyzing data about the nonprofit world), I've been growing my skills at creating interactive graphics and contributing social media reporting. In November, Jake and I drove up to Penn State to watch my brother play a hockey series (it's his senior year), and I also spent Thanksgiving with my extended family in New Jersey.

And, I almost didn't make it to today's edition of LetsLunch.

My contribution to today's celebration lunch may surprise you: latkes. We're not Jewish, but my college roommate was, so I spent a good amount of time in college at the campus Hillel. Some of what we did there was relating to the culture, some relating to the religion. But what stuck with me was the food.

In the spirit of Hannukah, I decided to make some latkes last night. I had attempted latkes previously, first, in our college apartment, just winging it (they were too wet, too gummy and took way too long to hold our interest), then a couple of years ago using a recipe from Smitten Kitchen. They were easy enough to make, because you shredded the potatoes using the food processor, but I didn't love them. These were essentially hashbrowns.

latkes2010

So, last night, I went back to box grating. I kept the recipe small, only using three Russet potatoes. In exchange for the time it took to grate the potatoes, I skipped the steps that usually go into trying to keep the potatoes from oxidizing (cold water, ice, etc). I alternated between using a coarse grate and a fine grate. After using my flour sack towels to squeeze, squeeze, squeeze as much moisture from the potatoes as I could, I also added about 2/3 of a grated onion, an egg and about 2/3 cup of flour. If I had really planned ahead, I probably would have used matzoh meal.


What I liked about these is that they were crisp on the outside, and nice and potato-y on the inside. Three potatoes yielded about 20 latkes. They're best served immediately, while they're still hot (salt them immediately), but I had a few for breakfast this morning, and they heated up nicely in the toaster oven. 

You can see in the fun .gif file above, I fried mine in a shallow, nonstick pan in batches of about three or four. I used an ice cream scoop that was about 3/4 full for each latke. If you can, dip the spatula in the oil before pressing down on the scoop of potato batter to flatten, it helps with the sticking. 


I'm pretty basic with my latkes, so I serve them with sour cream and a little coarse salt.
--
Check out the rest of the Let's Lunch posts today by following the hashtag #letslunch on Twitter or clicking through below. If you would like to join us next month, send us a tweet introducing yourself! I'm @emmacarew on Twitter.

Cheers to this month's host, Rashda! See all of the fabulous blog posts on her pinboard.

Annabelle's Pecan Slices at Glass of Fancy

Linda's Sorrel Cocktail at Spicebox Travels

Lucy's Ham and Cheddar Cheese Scones at A Cook and Her Books

Grace's Persimmon Salad at Hapa Mama

Joe's Orange Honey Cake

Thursday, September 13, 2012

Korean snacks: deconstructed tteok-bogi and kimchi pancakes

Since moving to DC, most of my cooking has fallen into two camps: recipe testing for the newsletters I'm continuing to write for The Cooking Club and lots of Korean food. 

Jake made some baked tofu recently with a sweet and spicy gochuchang-based sauce. We used the leftover to make a tteok fondue of sorts. I had these extra long rice cakes in the freezer and I made them the Momofuku way for dipping in the red sauce. 


The rice cakes went into a very hot cast iron grill pan with vegetable oil until they started smoking. Once they were browned on all sides, I brushed them with sesame oil and took them off the heat. I served them with grilled odeng (the fish cake) and dipped them in the warmed gochuchang sauce.


The gochuchang sauce includes brown sugar, grated ginger, minced garlic, soy sauce, sesame oil and gochuchang. It's a bit stronger and sweeter in flavor, I think, that your typical tteokbogi sauce.


There comes a point in every jar of kimchi when you take a sniff and there's only one word to describe your result: funky. It's that point where the sharp, pungent taste of kimchi has ripened a bit over the edge. It's not that you can't eat the kimchi any more, it's just not as delicious as when you first break open a brand new jar.

Thankfully, there are plenty of options for extra ripe, funky kimchi. One option, great for the fall and winter months is to make a steaming, bubbling pot of kimchi chiggae. Better for the summer months, I'm a fan of kimchi pajeon (above).

I also had some homemade Korean radish pickles in the fridge that had also gotten a little funky, so I chopped it up with the kimchi and mixed them into the pancakes. It's always hard to get these crispy enough (as soon as you put them on a plate, the steam trapped between the hot pancake and the plate condenses), but they are fabulous dipped in soy sauce and sprinkled with toasted sesame seeds.

Korean snacks have definitely been one of the highlights of moving back to DC this summer. Enjoy!

Friday, September 7, 2012

#LetsLunch September: three grandmothers' recipes

This month for Let's Lunch, our group decided to post recipes from our grandmothers to honor our friend Pat, whose book The Asian Grandmothers Cookbook came out in paperback recently.


What I like about this book is that it's a great primer to Asian cuisine. Pat includes a sections on techniques and common ingredients in addition to the great recipes. 

I felt like a kindred spirit to Pat reading the introduction of the book, growing up in a country away from her heritage. Like Pat, I also learned to connect with my culture through food, she via her mother, me via a mishmash of culture camps, dance moms and later, blogs and YouTube videos.

I grew up far away from all of my grandmothers. My paternal grandmother died when I was very young, and we lived halfway across the country from my maternal grandmother. I only met my Korean grandmother a handful of times before she passed away last year. 

So, needless to say, I'm not exactly a wealth of family recipes. My favorite recipe from my Nan is her Irish Soda bread, which I posted last year for Cheryl's Family Recipe Day


I've made this bread time and time again since first receiving the recipe for it in college. The oven temp is boldly written at the top of my recipe book page because the first time I made it, I misread the emailed instructions and baked my bread at 450 for an hour. Not quite "burnt" but definitely tougher than expected. 

I didn't spend much time around my dad's mother -- in fact, I'm not sure I can even remember having a meal she cooked. But I know that she used to cook Polish food, a nod to a small slice of her heritage. 

Two years ago, I jumped at the chance to head north a day early to help my aunt make stuffed cabbage rolls and pierogies for Easter. I had never gotten the chance to do this with my Grandma, but this was the best substitute I could have had. 


(These are the actual cabbage rolls we made for Easter two years ago, and the pierogies on the right are ones I made last summer. Recipe is here.)

And, being an adoptee who has searched for and found my biological family, I'm in the strange position of having had three grandmothers during my life.


My wei-halmonie, my birth mother's mother, first came into my life in 2005 when I went on my first trip to Korea. She made dinner for my mom and I when we went to visit the family's home in Inchon. The dish I hoped to someday learn to make is captured in my chopsticks above. I'm not entirely certain sure what they are called, but they're sort of a small, Korean vegetable/fish pancake thing. They're about the size of a silver dollar and awesomely delicious.

Next time I'm in Korea, hopefully someone in my family can teach me how to make them, since my halmonie passed away last spring. I'm also hoping to learn the name of these yummy nibbles.

So, cheers to our friend Pat and do check out her awesome book, The Asian Grandmothers Cookbook.

Check out the rest of the Let's Lunch posts today by following the hashtag #letslunch on Twitter or clicking through below. If you would like to join us next month, send us a tweet introducing yourself! I'm @emmacarew on Twitter.
--

Karen's Ode to Nana on Geofooding

Linda's Taiwanese Oyster Omelet on Spicebox Travels

Lisa's Polish Potato Cake on Monday Morning Cooking Club

Cheryl's Gambling Rice on A Tiger in the Kitchen

Jill's Stuffed Cabbage on Eating My Words

Charissa's Gluten-Free Depression-Era Cake at Zest Bakery

Thursday, September 6, 2012

Pumpkin Pasties


Harry Potter is one of my favorite books ever. I've read them each about 100 times and have the British version of all seven audio books, which I've also listened to about 100 times each.

So when my recipe testing last week turned up an extra half can of pumpkin, I knew exactly how I wanted to use it up: Pumpkin Pasties.

Last year, Serious Eats did a "Cook the Book" series from an unofficial Harry Potter cookbook that included a recipe for Pumpkin Pasties, one of the treats Harry buys on the train during his first journey to Hogwarts.

The basic gist of the recipe is to make a homemade pie crust and fill it with pumpkin-y goodness. Mine were a little smaller than the Serious Eats ones, I think, so I baked them at 400 degrees for 20 minutes.

I mixed my half-can (the big size) of pumpkin with some cinnamon streusel topping that I also had leftover from recipe testing last week. I used a butter pie crust recipe from Michael Ruhlman's Twenty, brushed with an egg wash and sprinkled with sugar. The result was a nice, not-too-sweet filling with a flaky pastry.

If you don't have leftover cinnamon streusel, I would guess mix about 1/3 cup brown sugar, 1/4 cup rolled oats, 1/4 cup diced pecans, 2-3 tsp cinnamon, 1 tsp nutmeg and stir into the pumpkin.