Showing posts with label chocolate. Show all posts

Sunday, February 20, 2011

"whoopsie" pies - an accidental success

Now that I'm home on Mondays instead of Saturdays, I try to make my day off a mix of a few things: relaxing and occasionally staying in bed until noon, running my errands, and doing some serious damage in the kitchen.

A few weeks ago, I decided to do another test run on the cakes I'm baking for a friend's wedding this summer. I was pretty sure I had locked into a cake recipe, but wanted to try another just to be sure. I chose this recipe from Pioneer Woman.

You'll notice the title of this post isn't "really awesome test run cupcakes." So, clearly a few things went wrong.

First, I somehow ran out of cupcake papers, so I was forced to use my silicone cupcake tray. I'm not a huge fan of this, because it usually makes squat little cakes rather than nice fluffy ones.

Next, and more importantly, I somehow managed to leave the leavening agent out of the cake batter. So my first batch of "cupcakes" came out like little hockey puck cakelettes. I halved the baking soda in the recipe and added it for the second batch.

My second batch stuck to the silicone pan and were mostly ruined, until I decided to lop off the bottoms and just use the tops to make whoopie pies.

So, I sliced all the little flat cakes in half, and paired them up along side the more cake-like tops of the actual cupcakes. I whipped a batch of the peanut butter mousse I will probably use for the wedding this summer and my "whoopsie" pies were born.

The  slightly smaller ones are the ones without baking soda, and the larger ones on the upper right are the more cakelike ones. 

Overall, they were still really delicious. I think I like my original whoopie pies recipe better but this was definitely a decent way to save this recipe. 


PEANUT BUTTER MOUSSE FILLING:
Mix 1 stick of butter with 1 cup of peanut butter on high. Slowly add 1 tsp vanilla and about 2 cups of powdered sugar.
If filling is too crumbly, dribble up milk one teaspoon at a time. Add 1 more cup of powdered sugar, or until fluffy.

Sunday, December 12, 2010

Holiday gift recipes: a rundown

I've been a little remiss in my holiday baking this year (partially owing to the fact I'm trying hard not to eat holiday baking this year, and partially owing to the fact I'm about to go to my 5th potluck in 6 weeks)

But, here's a quick look at some of the holiday gift cooking/baking I've done:

First up, and probably most successful in terms of a) money spent, b) time spent and c) ease of process.

Homemade spiced rum: I found a recipe on this on Serious Eats a few weeks ago and immediately decided to make it. About half of the spices, most people will already have in their kitchens. I thought I had almost all of them, but then realized a few more had fallen casualty to the move over the summer.


I started with a 1.75 bottle of Bacardi Gold and used the following: cloves (whole), all spice (whole), nutmeg (ground), star anise (whole), black peppercorns (whole), cinnamon sticks (I broke mine in half), vanilla bean (1 - split down the middle, seeds scraped), ginger (two 1-inch sized pieces, peeled) and the orange peels from half an orange (remove the pith really well with a paring knife).

When I measured out as the Serious Eats recipe called for, however, I thought it looked pretty pathetic, so amped up to about 1 teaspoon of each spice. After tasting the second day, I removed about half of the orange slices. They had given off a sweet, fragrant taste quickly, and I didn't want it to overpower the rum.
The whole project, after straining, made about 4 of these pint-sized flasks. I loved really cute glass ones on Crate and Barrel, went to Ikea to search for similar ones, and ended up finding these at the Rainbow Foods liquor store (they're "unbreakable" plastic), so I attempted to cheer them up with a fabric wrapping.


Next up, a recipe I found on The Kitchn blog: hot cocoa on a stick. I thought, oh fun! how cute! I bet those will be a snap!

This is basically 8 oz of tempered chocolate, mixed with powdered sugar and more cocoa powder to make it fudge-like. You pipe into molds (I spooned mine in since I only had 6 molds to fill), stick a stick in it, and let them harden.

Sounds, oh-so-easy.

I took a few liberties with the instructions, such as using candy canes for the sticks (it's a blizzard, people... you do not run to the store in 17 inches of snow for coffee stir sticks) and using these cute snow-men molds that I picked up instead of standard size ice cube trays.

The chocolate only made enough to fill these six molds, then the chocolate wasn't firm enough to hold up the weight of the candy canes.

Then when I went to pop them out, I accidentally broke two canes!

So, in all, not the favorite in terms of ease or gifts produced. But, the four little snowmen that DID survive are going to be a cute hostess gift for a friend.


Last, but not least, this is a repeat from holiday 2009: Brady's Christmas Caramels.

These are far less nerve wracking to make the second time around. Melt 2 stick of butter, add 2 1/2 cups brown sugar and a pinch of salt, stir in a cup of light corn syrup then a can of sweetened condensed milk, and keep the pot moving.

The caramel cooks for between 15 and 20 minutes, and needs to be stirred constantly. If you have a reliable candy thermometer (that you have used before with good results), clip it to the side of your pan and aim for about 240 F -- soft ball stage.

If your candy thermometer sucks (like mine) use it as a rough estimate, and start cold-water testing the candy at about 220 F. Take a fork, swirl a few drops of the caramel into cold water. The caramel is done when it holds it's form (a soft ball) when you retrieve it from the water.

Be careful though, because the caramel will continue to heat a little, even after you turn off the heat, so don't let it go past "hard ball" stage -- or it will be tough to cut up your candy (see last year's post on hard caramel)


Instead of using a buttered pan, I took a big sheet of parchment (bigger than the 9x9 pan) and laid it over the pan with a little oil spray. Pour the candy onto the paper and spread into the pan. This makes it incredibly easy to remove the caramels later (just lift the paper). Cut into 1 inch pieces and wrap with parchment.

This requires a little more work than the rum but a 9x9 inch pan makes a TON of caramels and they are a really fun treat. This remains one of my favorite holiday recipes!! Thank you SO much for sharing it, Brady!!

Sunday, May 9, 2010

Sticky caramel and coconut cupcakes


These cupcakes are adapted from a cake recipe my friend Holly introduced me to in college. "Bette than sex cake," was what she called it. Not exactly safe for bringing goodies to work.

Take your favorite chocolate cake - we use Betty Crocker German chocolate (yes, I actually used a box mix for this). Poke holes in the cake as its cooling. If you're making a sheetcake, use the end of a wooden spoon. For these, I used the larger end of a chopstick.


Let the cake cool completely. Mix together 1 can jar (about 12-14 oz) of caramel and 1 can of sweetened condensed milk and pour over the cake. This gets insanely messy. I ended up sort of painting it on with a silicone brush. addendum: For a sheet cake, you will probably use all of the caramel, and all of the condensed milk. For 2 pans of cupcakes, I had a TON of leftover, so I just spooned it back into the caramel jar for later uses.


Give the caramel about 30-45 mins to soak into the cake. Use 1 can of pecan coconut frosting and ice the cupcakes.


Top the frosting layer with a layer of whipped cream (the recipe calls for cool whip). I also like to go one step further and dip them in coconut.


Dreaming? of a cupcake reunion with Holly and Courtney

Monday, February 15, 2010

Lunar New Year

Happy Year of the Tiger to all! 새해 복 많이 받으세요 


On the lunar new year, or 설날 (seollal) Koreans allegedly start the day with a big bowl of tteok guk - or rice cake soup. 


For me, it was just a good excuse to whip up this simple, tasty favorite. 

A simple broth is brought to a boil (I used about 1 1/2 c of my pho beef stock with about 1 c of water).


Then add sliced tteok (Korean rice cakes). I only had tteok-bogi tteok in the house, but they do make pre-sliced soup-style tteok.


The thinly sliced beef is optional, but I find it rather tasty. You can also add a small bunch of sweet potato (jap chae) noodles if you like.


Also chop up a scallion or two. Season the broth with 2 TBS soy sauce, 1 TBS sesame oil.


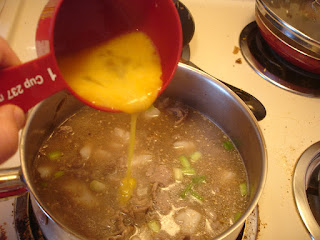
Pour 1 beaten egg over the boiling soup and wait 10 seconds, before drawing figure-8s through to create egg ribbons.


Garnish your soup with black pepper and thin strips of toasted seaweed (gim or laver)


Jake and I also had some great eats for Valentine's Day: 


Dreaming? of getting back into the gym this week! Had a lot of great eating in the last week, time to get back on track.


Thursday, February 11, 2010

Mmm chocolate

Anyone looking for proof that chocolate makes EVERYTHING better? 


For instance, let's say you pipe four trays of pate a choux discs, and in your attempt to keep them from burning, you open and close the oven a bunch to rotate them, and they end up looking like this: 

 Rather than this: 


So, you melt a bag of chocolate chips with a little vegetable oil, stir in some half&half and dip away:

Pop them back in the freezer, and you've got chocolate eclairs. Problem solved! 

Dreaming? of a frozen eclair with perfectly formed chocolate shells.

Saturday, February 6, 2010

Makin' whoopie (pies, that is!)


Saturday night, and we're still snowed in. The big win for today is the fact I was able to master whoopie pies! :) YUM. 

Here's how it all went down: 

First, amazingly chocolatey batter. I used this recipe from epicurious.com, except I found myself without buttermilk, yet again. I substituted 6 oz yogurt, 1/4 c half and half, and 1 1/2 TBS white vinegar whisked together.


I also finally found a use for the melon baller my mother slipped into my stocking a few years ago (after a conversation when I asked what on earth people would use a melon baller for. Today was the first time I've used it!) I also kept a little dish (it's a condiment dish I nicked from Applebee's a few years ago) of vegetable oil nearby, and dipped the melon baller in it after each one. This keeps the batter from sticking and generally causing a mess. It also coated the balls with oil, and gave them a nice shiny crisp.

BAKING!!!
Cooling -- this recipe made about 4 sheets of cookies.


In the mad rush that was the pre-blizzard snow storm, I forgot to grab marshmallow fluff. Giant, very bizarrely keeps this with the peanut butter and jelly, not with the baking supplies, nor with the other marshmallows. 


The recipe doesn't call for it, but I had a little cream cheese (about a two-inch piece) that I threw in, as well as an extra half stick of butter and more fluff. I also used about 2 TBS half and half to help thin it out a bit. 


In the end, they were perfect. The insides fluffy and tasting of marshmallow, the outsides soft and cakey. YUM. 
 

Wednesday, September 30, 2009

Caramello Koala!!

A co-worker brought these in to work today, a gift from her Australian friend. Super cute AND delicious!