Friday, November 26, 2010

Seollangtang: Korean oxbone soup (an imperfect, but tasty first attempt)


In August, my friend Patrick took me on a food tour of Koreatown in L.A. I first met Patrick in 2008 during our summer internship at the Star Tribune. Patrick is a "real" Korean compared to me, and helped me out when I decided to attempt to make mulnaengmyun the first time. (I got the package home only to find I couldn't read ANY of the instructions)

Korean restaurants are usually based around 1 dish: ramen restaurant, kimbap restaurant, bossam restaurant, etc. In America, we're big proponents of having a spectrum of food on the menu.

Our journey in L.A. began with seollangtang, or Korean oxbone soup. I was immediately taken with how thick and meaty the broth was, and overall, how delicious the concoction was.

I checked on my go-to source for Korean recipes, Maangchi but at the time, she didn't have a recipe posted! (there were, however, three or four postings in her "recipe requests" forum begging for a recipe and video)

Then last week, Maangchi heard our cries, and posted her recipe, photos and video of seollangtang. I had yesterday off for Thanksgiving, so I decided to give it a try, starting Wednesday and continuing on Thursday.

The basic premise of seollangtang is you boil ox leg or ox tail bones for a long period of time to extract the marrow and calcium, turning the broth a milky white color.

So, I soaked the bones, par boiled them to remove dirt and scum, rinsed them, and then threw them on to hard boil for three hours.


Yeah, that clock says 12:12. I started this process at 6 p.m. on Wednesday night. And yes, the broth DOES look painfully brown and beefy.

I pulled the meat from the bones, replaced them in the pot, and called it a night.


So, I left the pot out on the porch overnight (no room in the fridge!), poked around online for answers about why my soup wasn't turning white.

Bright and early thanksgiving morning I ran back to the market where I purchased two more packages of oxtails and one package of beef feet (something I had read or watched online referenced beef feet, so I figured I'd give it a try).

I had to go through the soaking, washing, boiling, rinsing song-and-dance once again, then started my pot up again. Then we had to go to Thanksgiving dinner, and when we returned, I lit the burners once again.

Luckily, the broth started to lighten (as evidenced here, at 9:42 p.m. on Thursday).


At this point, the broth had boiled for 6 hours on Wednesday night, two hours on Thursday morning, and about one hour on Thursday night. I let it go another hour or so, then finally decided to to taste the soup and see where it was at.


It wasn't perfectly milk-white, but it was tasty and meaty. So, once again, I called it a night. I brought it for lunch today (the first photo) and it was pretty darn good.

I might throw the pots back on the stove for another couple hours tonight, but for now, I recognize it was an imperfect first attempt, but the results were still tasty.

Thursday, November 25, 2010

Wendy's easy hoisin ribs

I love ribs.


No, seriously. I really, really love ribs.When I was a kid, my family used to celebrate my plane day (the day I was adopted) and my dad's birthday together by going out for ribs. And to this day, I can't resist a good plate of ribs.

I first attempted to make ribs in June of this year. You'll recall I foolishly slow cooked them IN THE OVEN in a small apartment, no AC on, on a nice 80 degree day in Washington.

Well, I now live in a home where the heat doesn't run in the kitchen, and it's about 18 degrees when I get home at night. Bring on the ribs.

This recipe comes from my friend Wendy, whom you first met during the dimsum party I hosted this fall. She made these awesome, sweet and sticky ribs for a party last weekend. When I saw ribs on sale at Shuang Her on Monday, I knew I had to make them.


Wendy suggests marinating the ribs overnight, but I just couldn't wait. My ribs sat for about an hour, then I popped them in the oven. I would imagine they would have been more tender had I been patient.


RECIPE: Wendy's easy hoisin ribs

Place ribs in a baking pan and slather with hoisin sauce (about 1/2-3/4 cups for 2 racks of ribs). I had to stack mine a little

Season with salt and pepper (I omitted the salt, since the hoisin is really salty)

Cover with foil and allow to sit at least one hour, but up to one day if you can stand the wait!

Bake at 400 degrees for one hour. At the end, I removed the foil, basted the ribs again, and popped them back in at 450 for about 5 minutes.

Sprinkle with chopped scallion and toasted sesame seeds if you like.

Monday, November 22, 2010

Potluck success! Korean glass noodle salad (japchae)


A friend hosted an office potluck and karaoke party last night and I was torn between making sesame noodles or Korean japchae. After I saw Maangchi's recipe and post on her blog though, I decided to go with the latter.

 The heart and soul of japchae comes from the noodle. Japchae noodles are made from sweet potato starch and are thick and chewy. They have an awesome consistency when cooked right that allows them to be eaten hot or cold with the same enjoyment. I used two bundles of noodles since I was cooking for a large group. Otherwise, 1 bunch would probably do. When the noodles are done cooking (~5 minutes), remove them with tongs, and do not drain the water. Repeat: DO NOT drain the water. Rinse your noodles in cool water to stop the cooking, then toss with 2-3 tablespoons of sesame oil.

Why? because you need to blanch the spinach, and the time you would take to boil another pot of water is a huge waste. So. Do the right thing and use the water twice. Blanch 2 bunches of spinach (washed, stems roughly chopped off) for about 30 seconds, then rinse to cool. I only used 2 bunches, and had to add a bag of frozen "Steam Fresh!" so, if you were making a regular sized batch, I would still go for 2 big bunches. Set the spinach aside. You can mix with 2 TBS soy sauce and some fresh or powdered garlic at this point.

Now, get that chopping arm ready. Chop 4 carrots, 2 bell peppers, 2 bunches of spring onions (somehow I didn't get a picture of those) and 1 large onion into match-stick size pieces (thin slices for the onion). If you're making a small batch, just half those portions. Fry each in about 1 TBS oil for ~2-3 minutes (~ 4-5 for the onion) then pour into the noodles.

The last step, slice up some shitake mushrooms (I used fresh, but you'd be fine to use dried -- just let them steep in hot water for 15-30 minutes until soft) and some beef. Use any cut you like. You want equal proportions of beef to mushrooms, and make them about the same size- 1-inch or smaller strips. Fry them together (you don't need any oil, the mushrooms release a ton of liquid) with 2 TBS soy sauce, 1 TBS sugar and 1 TBS rice vinegar or rice wine. Drain the liquid, the add to the noodles.

Lastly, season your entire bowl with about 1/2 cup soy sauce, 1/3 cup sesame oil, 1/4 cup sugar and a small handful of toasted sesame seeds. Mix with your hands to incorporate all of the ingredients.

Serve warm or cold with rice and banchan.

Shopping list (for a regular sized batch - serves 6-8)
Korean sweet potato noodles (1 bunch)
Spinach (2 bunches)
Carrots, 2 (if you get the asian-style carrots - they're huge - you probably only need 1)
Red bell pepper, 1 (if you're going to leave out anything, this would be the 1 optional ingredient)
Green onions, 1 bunch
White or yellow onion, 1 small to medium size
Shitake mushrooms, about 6-8(I probably used 10 or 12 for the big batch)
Beef, thinly sliced (the cut I bought at the Asian grocery was called "beef-regular" and cost $2.49 a lb)
Soy sauce
sesame oil
sugar
toasted sesame seeds

Wednesday, November 17, 2010

Korean barbecue ribs (Kalbi)

One of the biggest challenges I've had since I've moved back to Minnesota is finding the perfect cut of beef for bulgogi. In Washington, I shopped at HMart, a Korean grocery store. Finding beef for bulgogi was easy -- it was presliced, and you could buy some that had been marinated by the ajummas in the store.

Here? It's another story. Most of the beef I've gotten for what I consider to be a reasonable price, then sliced myself, has a) been sliced too thick and b) ended up kind of tough.

What is readily available in the Asian markets nearby, however, are short ribs -- the meat used to make Korean kalbi.

I cut the slabs into individual sized pieces, then marinated them over night with a sliced onion and a ton of garlic. Then, into the grill pan they went.


I was thrilled with the way these turned out. The meat was juicy and charred from the grill pan. I served the galbi with the fried onions and enoki mushrooms.

And Korean food isn't complete without kimchi, but I didn't have any on-hand, so I threw together a sort of quick "faux" kimchi -- mixing together homemade quick pickles, daikon radish, spring oninos, some rice vinegar and gochuchang. Super tasty.


RECIPE: Kalbi
1 lb short ribs, cut into individual pieces
1/2 cup soy sauce
1/3 cup rice wine vinegar
1/3 cup honey
1/4 cup sesame oil
1 onion, thinly sliced
8-10 cloves garlic, smashed or sliced
1 bunch scallions, chopped (dark green parts only)

Whisk together liquids and pour over kalbi in a large plastic bag. Mix in onion, garlic and scallions. Marinate at least 2 hours, up to 24.

Heat a grill pan over high heat, then reduce to medium. Grill ribs 2-3 minutes on each side or until cooked through.

Grill 1 bunch enoki mushrooms per person and toss with onions. Sprinkle with toasted sesame seeds and serve.


RECIPE: quick "faux" kimchi
3 pickling cucumbers, cut into half inch pieces (the short, fat ones. But you could also use the long skinny seedless japanese ones)
1 TBS sugar
1 tsp salt
1 tsp rice vinegar
Equal amount of pickled daikon radish (called dan-muji), about 1 round piece, 5 inches long, also cut into half inch pieces
1-2 TBS gochuchang
white and light green parts from the scallions used in kalbi marinade

Mix the sugar, salt and rice vinegar and pour over the cucumbers. Allow to "pickle" for at least 15 minutes, up to a few hours. Drain, then taste after 15 minutes. Adjust seasoning if necessary. (If they're too salty, give 'em a quick rinse)

Mix pickles with daikon and stir in gochuchang. Sprinkle with scallions and toasted sesame seeds.

Serve with other banchan (Korean side dishes) and barbeque.


Friday, November 12, 2010

Let's Lunch! Fall soups edition

Happy Let's Lunch day, gang! I was very excited when we chose fall soups for our November theme -- not because I'm a great soup maker, but because I was dying to see what everyone else was going to make.

I went simple: roasted tomato soup. I didn't really follow a particular recipe, just combined steps I liked or sounded good from a couple of sources.

The result was awesome. Jake and I have both been eating a lot of tomato soup lately -- and this was a great way to bring down the salt levels, and make a more delicious (and really, just as easy) option.

So, I started by roasting a bunch of tomatoes. I did it in 2 batches, about three large cans of diced tomatoes on each. I rinsed the tomatoes to get rid of any residual "can" taste and excess liquid, then seasoned with olive oil, kosher salt and pepper. About halfway through, I added a handful of crushed garlic cloves (about 8 or 10, I think) and some thinly sliced onion (maybe one small onion).


While the tomatoes were roasting, I made homemade stock. I always hang on to "odds and ends" when I'm cooking so that I can toss them in and make a richer stock. That all paid off with this batch -- the stock was silky and full bodied. It tasted amazing.

Veggies! Leeks, celery, onion, carrots then topped with a chicken carcass, bay leaves and water. I simmered the stock while the tomatoes were roasting (about 1 hour at 450, tossing about halfway through to carmelize more of the surface)

Tomatoes, cooling on the back porch.

Stock, also cooling. I skimmed off some of that fat from the top after it had cooled.

Once both the tomatoes and stock were cooled, I mixed them in about equal portions in the food processor (yes, it would have been easier with a hand blender... but I'm still on the fence about whether or not I need one of those)


Once all of the soup had been pureed, I tossed in some soup seasoning I picked up at Penzeys (it is DANGEROUS for me to live down the street from this store...) and sprinkled some chiffonade basil, then heated through.


---------
#letslunch is a monthly "gathering" of food-loving writers from all over, hosted by Cheryl Tan, of A Tiger In The Kitchen.

We agree on a date and a theme, then each blogger presents his or her recipe on the chosen date (today).

Cheryl's Cantonese style Winter-Melon Soup
Linda's gluten-free Oven Baked Soup
Ellise's French pumpkin Potimarron Soup
Steff's Carrot Habanero Soup
Danielle's Carrot Soup with Chicharonnes 
And, a big hug and welcome to fellow AAJA-er Mai's Apple Beer Cheese Soup

*updated: I'd like to join the toasts raised by others (in their posts and on Twitter) to Cheryl, for starting the group, and to the entire group for continuing to make it such a rich and tasty experience. Cheers, everyone.

Thursday, November 11, 2010

Breakfast!


Now, normally, I'm not a big breakfast person. But lately, I've taken a liking to toast and eggs. 
I jazzed these up this morning and was so incredibly pleased with a) how easy it was and b) (and more importantly) how delicious it was. 

Super simple, can hardly even call it a recipe:
2 slices of bread or halves of english muffin. It would also be tasty on a biscuit or bagel. 
2 eggs
about 1/3 c shredded cheese (I had smoked gouda and it rocked)
about 1/3 c baby spinach leaves

Put two slices of bread or halves of English muffin in the toaster (or an oven set to 250)

Fry two eggs over easy. I like to leave the yolks a little runny, but cook to your liking. Season with salt, pepper and smoked paprika. Season *both* sides of the eggs! 

Split the spinach and the cheese and arrange on top of the toast. 

Plop an egg on each toast (quickly! you need the residual heat from the egg to melt the cheese in a hurry)

Enjoy your breakfasty goodness. 

And, paired with a big pot of coffee and some nice fruit, this would probably make a great brunch for 2.

Saturday, October 16, 2010

Chonsa dance reunion: making mandu

We all have food memories. For me, mandu (Korean dumplings) is one of those foods that that brings up a flood of strong, vivid memories:

* Sitting in the cafeteria at Minnehaha Academy for Korean Culture Camp in third grade tasting the crunchy, savory dumplings for the first time.

* Staying late after Korean school on the days when the ajummas came to the church and cooked Korean food.

* 7th grade, in a friend's kitchen trying to fold the triangle dumplings for the first time.


Korean cooking has long been a social activity for me -- I learned how to cook Korean with my friends from my dance group.

Four of us met up this weekend at my place and mandu seemed like the perfect option -- we hadn't made it together in years.


Everyone's mandu filling is a little different. I made this one after referring to a few recipes online. This was a great chance to use my stand mixer to make blend the beef with the tofu. We made a double batch, so I had to make the filling in batches.


Mandu can be steamed or fried. We steamed some of them, but they kept sticking to the parchment and falling apart, so stuck with frying them in the wok. 

Lunch! We stopped midway and munched on the mandu with big steamy bowls of tteok guk -- perfect for a chilly fall day.

In all, my friends made about 200 dumplings today! They each took home bags full, I'm bringing some to a Halloween party tonight, and a bag or so went into the freezer.

RECIPE: Mandu filling
(Makes about 100 dumplings)

1 package ground beef
1 package medium firm tofu, drained and squeezed of liquids
3-5 cloves garlic, minced (or 1 TBS garlic powder)
1 inch piece ginger, minced ((or 1 TBS ginger powder)
1 tsp black pepper
2 tsp sugar
1/2 small cabbage, shredded finely
1 onion, diced finely
1 bunch scallions, diced
1/4 c soy sauce
1/4 c sesame oil
1/4 c rice wine

Push cabbage and onions through a food processor fitted with a shredding disc. Set aside

Combine meat and tofu until well blended. I used a stand mixer for this. Add garlic, ginger, sugar, and pepper.

Stir in shredded vegetables until fully combined.

In a separate bowl, whisk together liquids and pour over meat to season.

Drop rounded teaspoons into wonton wrappers.

Brush edges with beaten egg and press firmly to seal.

Fry on both sides until golden brown, or steam 8-10 minutes until meat is cooked through.


**Update: my house smells like fried mandu, all the way out to the front hallway. Some people might find this kind of disgusting, but it's a huge comfort to me for two reasons: a) the nostalgic reasons referenced above and b) it smells *exactly* like the Korean church used to on mandu day. This tells me my recipe and methods are relatively close to the real deal!

Friday, October 15, 2010

Let's lunch! Grilled Cheese edition

So last week I received a bit of a shock when the aforementioned Cheryl Tan tweeted me the following:


@emmacarew No problem! Love your blog. Say, wld you like to join my #letslunch group? We post lunch once a mth. Doing grilled cheese this wkless than a minute ago via web

I had seen her #letslunch tweets previously -- she and a group of farflung lunch enthusiasts all make the same thing for lunch then blog about it. And she invited ME to join this illustrious group.

So, here we are, Friday the 15th and I was not only thrilled to join, but couldn't be happier to start with one of my very favorite sandwiches: grilled cheese.

I don't normally like to mess with the classics, so this was a fairly straight forward take on grilled cheese.

I used 9-grain bread from Great Harvest -- left over from my trip to Des Moines. Smoked gouda and provolone cheeses, and finished with a brush of truffle oil -- a little tip I've been a fan over ever since the pilot episode of Gossip Girl.

Were I to do this again, I would have taken the time to shred the gouda. It took a long time to melt in these little slices.


I always start the bread in melted butter (both sides). Brushing with truffle oil gives it a nice nutty, dark flavor, and also some nice extra crunch.


Ok, guilty admission time:I planned a potluck at work today, so this was actually my breakfast this morning. BUT -- I maintain it was probably lunchtime *somewhere* out there.

I can't wait to see what the others post for their #letslunch. I'll update with links out to them as I find them.

**updated:
Cheryl Tan, in New York: Cheddar and blue cheese with Asian pears and rosemary honey
Linda, in St Louis: oven baked grilled cheese
Chris Perrin, I think in Kansas: 2 options, grilled cheese with black forest ham and pickles AND buffalo chicken grilled cheese
Cathy Shambley, in California: breadless grilled halloumi with bacon and apples 
Danielle, in the Bay Area: open face "mousetrap" sandwiches
Ellise Pierce, in France: grilled brie, pear and prosciutto

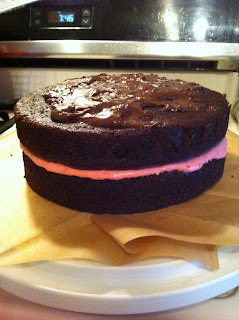
Chocolate cake

My friend Karyn is getting married next summer, and in addition to being a bridesmaid, I also jumped at the opportunity to supply the cake.

On a recent trip down to visit her, we took our first stab at trying to figure out what she wants. We made Ina Garten's chocolate cake, chocolate butter cream and a peanut butter mousse to fill it.


Today I put together my second attempt for a colleague's birthday in the office. I tried a simple raspberry creme for the filling and a fudgy frosting I found at Serious Eats.


The filling is so simple: make a raspberry puree, and fold it gently into some whipped cream, then chill.


The icing, I definitely won't be using again. It was so sticky and thick and hard to spread on the cake. It was especially a challenge with the raspberry filling.

Mostly, I ended up icing the top cake and letting the rest sort of swirl down the sides. Let's call it an artistic effect.

I love the raspberry creme as a filling. And I think it will be awesome to go as a cupcake filler too!

Sunday, October 10, 2010

Dim Sum swap party


This weekend I hosted three friends for a dim sum swap party. Each of us brought a different dim sum recipe, we helped each other fill and steam the dumplings, then ate a bunch, and swapped.

It was a great way to spend the day cooking with friends, and we each got to take home bags filled with dumplings to be frozen.

I took a first run at using Andrea Nguyen's basic dumpling dough, and used some tips from her website. I've been hesitant to use boiling water dough in the past (it's so hot!) but Andrea gives tips for making it in the food processor, which allows some of the heat to escape before you have to handle it.

The filling I chose is a recipe adapted from a high school friend Ali. Pork and leek are fairly common dumplings, I think. I swapped in a pound of turkey to try and make them a little healthier.

The party was a huge success - we had egg tarts, the pork dumplings, veggie dumplings and shrimp siu mai. I also made a quick version of the Momofuku steamed pork buns (which I've made before using David Chang's original recipe).

Thanks to a post by Cheryl Tan, a food writer/blogger and AAJA member whom I greatly admire, about making her mother's kong bak pau I learned about the existence of frozen steam buns sold at Asian grocery stores. I found them at Shuang Her on University Av. at $2.45 for a dozen.

Next month, we're hoping to tackle tapas and small plates for our group cooking. :)

dreaming? of my happily full freezer with bags of homemade dumplings

RECIPE: Pork dumpling filling (adapted from Ali & Matt)
2-3 lbs ground pork (I substituted 1 lb ground turkey in this recipe)
1 two-inch piece of ginger, minced (about 2-3 TBS)
4-6 cloves of garlic, minced (about 2-3 TBS)
2 small leeks (or 1 large one), minced
2 bunches green onions, the darkest green parts, chopped thinly
salt, pepper 1 tsp each
1 TBS sugar
3 TBS soy sauce
2 TBS sesame oil

Mix meats together with chopped ingredients. In a small bowl, combine the seasonings and liquid ingredients.

Pour seasoning over the meat and combine thoroughly. Allow to marinate at least 1 hour, then use to fill dumplings.

Steam or fry until cooked through.