So, for those who haven't heard by now, we're packing up our DC life in the next week or so and heading back to Minneapolis after the Fourth of July.
Yes, this is the umpteenth time I have moved in the past year. So a) yes, it means I get to start over in a new kitchen and b) the next 10 days are going to be some oddly cooking as I attempt to cook through the odds and ends I have left in the kitchen, to avoid throwing away most of the food.
First up (and an easy fix) is a loaf of bread to cut down on the big bag of bread flour I bought last weekend for the pork buns. I frequently just use all purpose flour for my bread (and have fine results) but didn't want to mess with the Momofuku recipe too much.
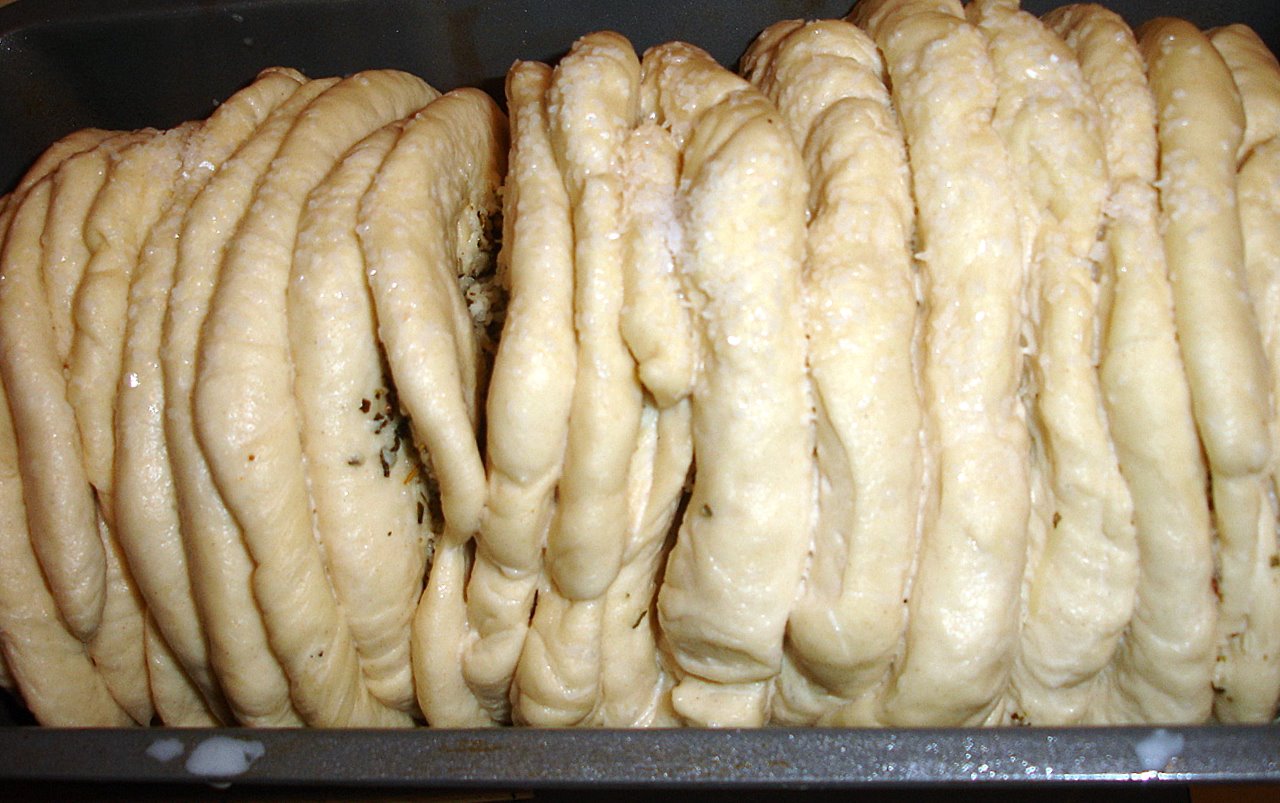
I found this recipe in one of my favorite baking books (one of those cheap ones I picked up on a bargain table) for pull-apart cheese and herbs bread.
Basically, you make a regular white bread dough (mine felt a little tough initially but I kept going with it anyway) and then roll 20 little discs about the size of your palm. Rub about a teaspoon of cheese and herbs mix into the center, then stack and repeat.
You turn the discs sideways and let them rise a second time in the loaf pan, and with any luck, they'll expand and fill your pan (mine did!) Brush with a little milk and sprinkle with kosher salt, and bake for just 30 minutes. I turned the heat down a little and added about 10 more minutes. When I pulled apart the first time, it seemed that the cheese and herbs had kept the very insides of the bread from baking all the way.
The result was a really nice late night snack (and really awesome left over for breakfast today). In the future, I would probably rub the edges of the discs with a little oil or melted butter. The crust from the milk and salt makes the edges harder to pull apart. But the bread turned out beautifully, and I would imagine, you could rub thin pats of butter between the layers and make pseudo-quick-croissants with the same method.
Recipe:
1 packet active yeast
1 TBS sugar
1/2 c warm water + 1 cup (divided)
4 c bread flour
1 tsp salt
1 TBS olive oil (for the dough)
1 TBS olive oil (for the cheese and herbs)
1/2 block of cheddar cheese (I used white extra sharp) shredded
2 TBS fresh or dried herbs
1 tsp freshly ground pepper
3 TBS milk (for glazing)
sprinkle of kosher salt
In a small bowl, whisk together yeast, sugar and 1/2 c warm water and allow to expand (10-15 mins). If your mixture does not foam and expand, the yeast is dead. Throw it out and start over.
Sift together flour and salt then make a well in the bowl. Drizzle in olive oil and yeast mixture then mix well to combine. Slowly add the remaining cup of water as needed until a ball of dough forms.
Turn out on a floured surface and knead for 10 minutes until smooth. Place in an oiled bowl and cover with a damp towel. Allow to rise 30-45 mins for rapid rise yeast, 45-1 hour for regular active.
Punch down and knead again briefly. Mix together herbs, cheese, pepper and oil.
Cut dough in half and cover one half. Roll into a log and make 10 balls from each half. Roll into discs, 3-4 inches in diameter. Fill each disc with about 1 tsp of cheese filling, brush edges with oil and stack another disc on top. As you go, press down in the middle, to flatten the stack and keep even.
Turn your stack sideways and place in a well oiled loaf pan. Cover and allow to rise another 20-30 minutes, or until the dough reaches the sides of the pan. Brush with milk and sprinkle with sea or kosher salt.
Bake 30 minutes at 400 degrees (rotate halfway through for even browning), then cover with foil, reduce heat to 325 and bake another 10 minutes. Turn out and cool slightly, but it's best eaten when still warm.